Best All mobile Repairing solutions, unlock pattern lock, Hang on Logo,All Box Latest UPDATES and All type CPU Format solutions provideing, How to Flash Mobile phone without BOX use and Open Google Gmail Lock

Showing posts with label nokia hardware. Show all posts

Sunday, November 2, 2014

Insert sim solution Nokia 225

Insert sim solution Nokia 225 SIM card problem jumper ways

Insert the SIM card or the identification of the problem or put to it will not detect any SIM card phone, the Nokia 225 is the solution. As shown on the image below we track down simcard pin connection. Insert SIM card error problem on the device, if we can use it for ease of troubleshooting.

Problems
Insert SIM card error.
Phone book inaccessible.

Tools
Jumper wire.
Soldering gun.
Heat gun / Heat Blower.
Multi meters.
LINK 1
Workaround
Your phone restart.
Clean, remove and re-insert your SIM card.
Check with any other SIM card.

Due to problems
This may be due to dust on the contacts to the SIM jacket.
This may be due to faulty capacitors. If any of them is faulty, then it will affect your overall SIM card function.
The issue could also be due to the SIM card IC.

Insert the SIM card hardware procedure Nokia 225
Clean SIM contacts and Czech jacket.
Change it to any of them is faulty, then with the help of a multi-meter to check all the capacitors.
A jumper to make any of them is faulty, then the SIM card connector with the help of a multi-meter to check the track ways.
All else fails then gently heat the SIM card IC, the method then replace the ball again or IC or remove sim ic and jumper wire a jumper does not help.  LINK 1

Nokia 206 Lcd light Jumper Solution

Nokia 206 display light solution
Nokia 206 LCD light not working
Nokia 206 problem of light
Light jumpers Nokia 206 Ways

Black or LCD display Nokia 206, is the cause of the problem, or it does not turn the LED has failed.
In this version of the solution, and in the darkness of the back of the LCD screen, LED screen, the Nokia 206 to help solve the problem.

The first confirm the problem to try to install a new replacement LCD screen, you, or is caused by a LED LCD problem. Back to work, hardware and solutions still do not solve the LED light.


Nokia 206 LCD Full Methods Blues
Resolution LCD panel and the backlight LED driver circuit breakers that have been shown. Factor driving circuit and LED functions.  LINK 1

LCD LED connector pin is connected to the negative parts to find onside can be downloaded to a positive start.
Check the battery voltage to a specific value for the cell phone for evaluating LED driver IC supply voltage of 3.7 volts.
In both directions and a thin line in all of the supply voltage, the LED driver IC continues to change.

Note: The Nokia 206 IC also can lead to failure of the joint is damaged, a panel of backlight LED driver. The rear LCD screen, backlit keyboard does not work, and it is only the LED chip driver can not be defective or damaged. LED driver IC is still in the works, and refers to well ...........................

Thursday, October 2, 2014

nokia lumia 625 sim jumper nokia lumia 625 sim card ways


nokia lumia 625 sim card ways path is
 the path lost sim reset sim pin number 2
 instead of number three  see image below
nokia lumia 625 sim card ways
nokia lumia 625 sim insert sim solutions
nokia lumia 625 sim card ways jumper
nokia lumia 625 sim card
nokia lumia 625 sim card ways path is
 the path lost sim reset sim pin number 2
 instead of number three  see image below
nokia lumia 625 sim card ways
nokia lumia 625 sim insert sim solutions
nokia lumia 625 sim card ways jumper
nokia lumia 625 sim card  Download
            

Tuesday, September 9, 2014

Nokia 108 RM-944 and RM-945 RX TX , D- D+ Usb Pinout


how to pinout pinout is a solutions for with out mobile
 flash cable only TX RX  and USB D- D+  and ground to flash and unlocking
 the phone with soldering iron u need a cable for fbus
See the ufs and jaf box pinout


how to pinout pinout is a solutions for with out mobile
 flash cable only tx rx and ground to flash and unlocking
 the phone with soldering iron u need a cable for fbus

Nokia 105 RM-908 FBUS Pinout


how to pinout pinout is a solutions for with out mobile
 flash cable only tx rx and ground to flash and unlocking
 the phone with soldering iron u need a cable for fbus
See the ufs and jaf box pinout


how to pinout pinout is a solutions for with out mobile
 flash cable only tx rx and ground to flash and unlocking
 the phone with soldering iron u need a cable for fbus
See the ufs and jaf box pinout 

Thursday, June 19, 2014

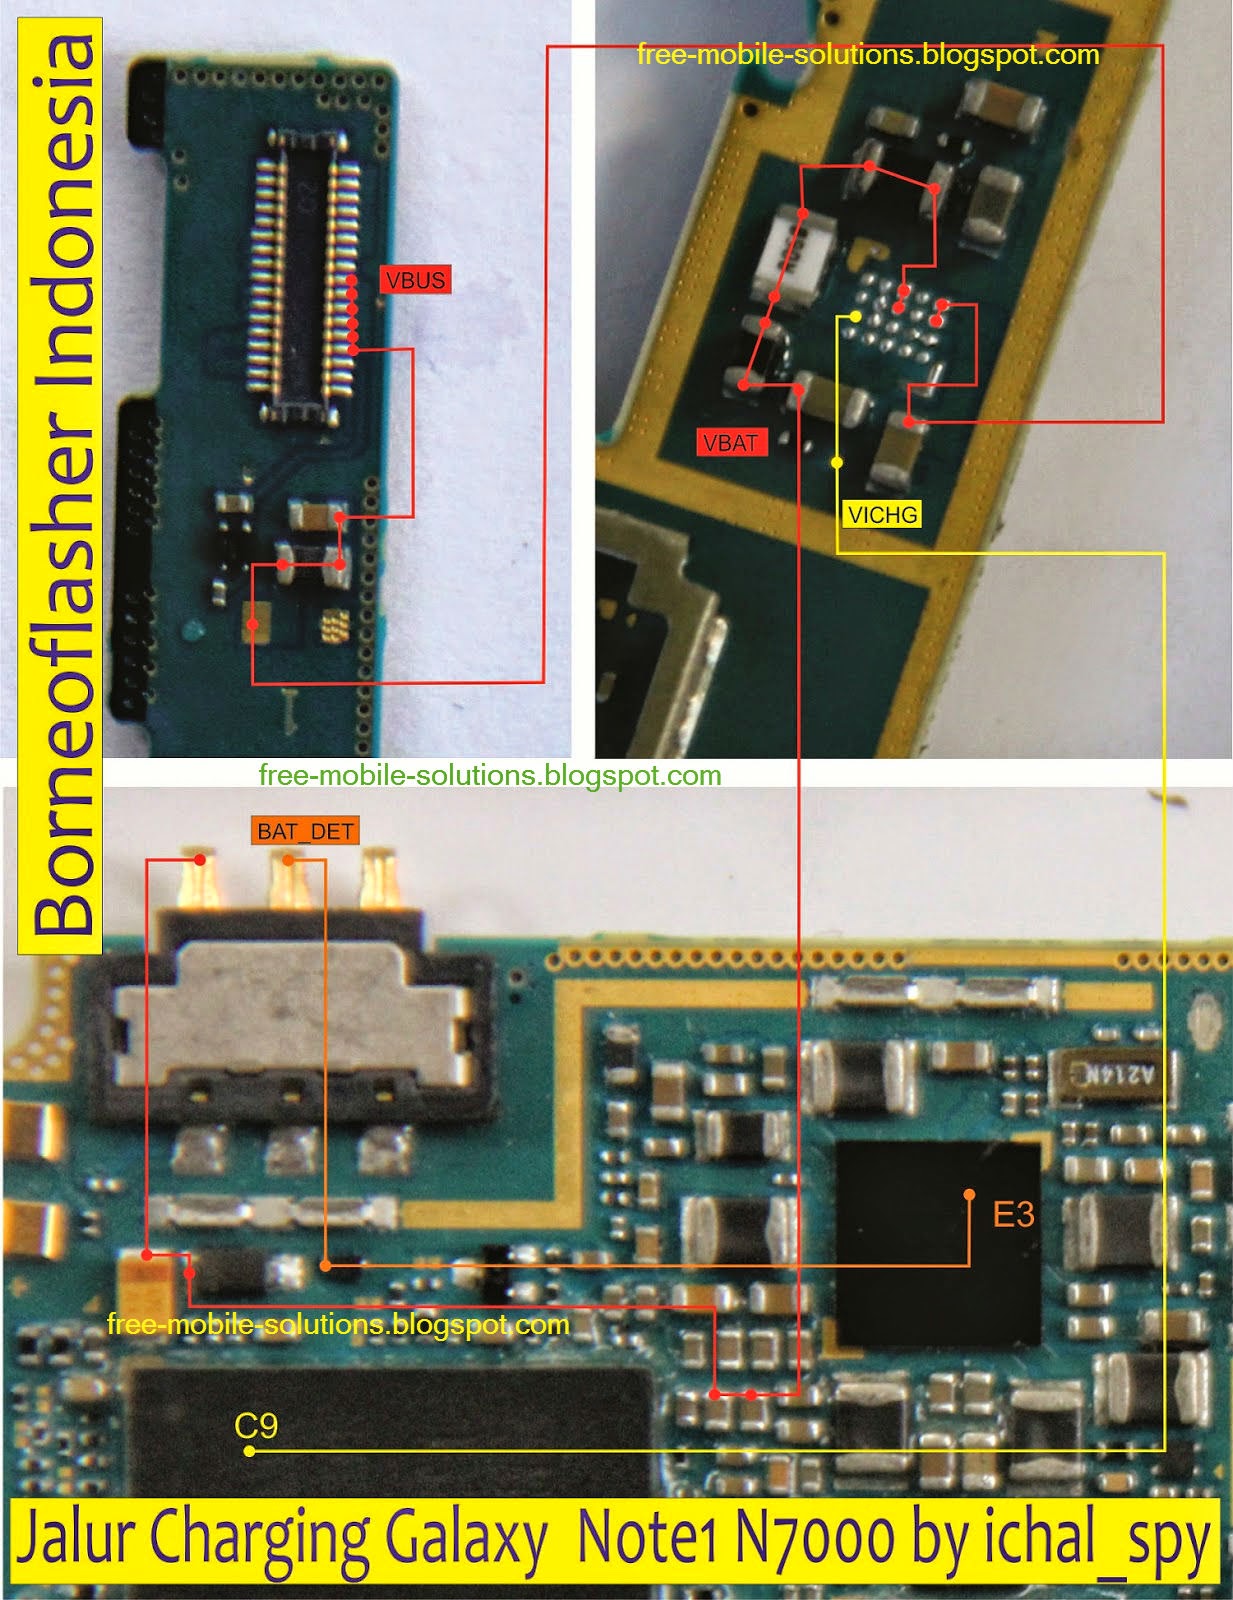
Samsung Note N7000 Not Charging Ways Solution


Samsung Note N7000 Not bestmobilerepairingsolutions Charging Ways Solution
Samsung Note N7000 Charging Problem Solution
Samsung N7000 Charging bestmobilerepairingsolutions Jumper Ways

By far, one of the worst problems noted in Samsung Galaxy bestmobilerepairingsolutionsNote N7000 is its charging problem, and this is mainly because if your charging connector is giving you problems then sooner or later your phone is going to be out of charge hence rendering you completely helpless, therefore it is highly recommended that one bestmobilerepairingsolutions should get it fixed as soon as one notices any such charging issues.

In the following lines you will get to know about some bestmobilerepairingsolutions of the charging problems related to Note N7000 along with their solution.

Note1 is not charging at all.bestmobilerepairingsolutions
Phone charges really very slow.
Galaxy Note 1 heats up during charging.
Phone does not give any response when charger is connected.

Reasons of ProblemsPhone bestmobilerepairingsolutions could be water damaged.
Dust particles might be present in charging connector.
Your Note1 charger might be faulty.
Connection in the phone might be broken.
Phone is encounteredbestmobilerepairingsolutions any physical damage.
Any of the capacitors might be faulty.
Charging IC might be faulty.


If the charging is slow then all you have to do is to check with any other Samsung Galaxy Note 3 charger, but you have to make sure that the charger is original, as slow charging issues almost always occurs with phones using 3rd party chargers.
Clean battery charging pins and check.
Clean charging connector pins.

Hardware Solution

Samsung Note N7000 Not Charging Ways Solution


Samsung Note N7000 Not free-mobile-solutions Charging Ways Solution
Samsung Note N7000 Charging Problem Solution
Samsung N7000 Charging free-mobile-solutions Jumper Ways

By far, one of the worst problems noted in Samsung Galaxy free-mobile-solutionsNote N7000 is its charging problem, and this is mainly because if your charging connector is giving you problems then sooner or later your phone is going to be out of charge hence rendering you completely helpless, therefore it is highly recommended that one free-mobile-solutions should get it fixed as soon as one notices any such charging issues.

In the following lines you will get to know about some free-mobile-solutions of the charging problems related to Note N7000 along with their solution.

Note1 is not charging at all.free-mobile-solutions
Phone charges really very slow.
Galaxy Note 1 heats up during charging.
Phone does not give any response when charger is connected.

Reasons of ProblemsPhone free-mobile-solutions could be water damaged.
Dust particles might be present in charging connector.
Your Note1 charger might be faulty.
Connection in the phone might be broken.
Phone is encounteredfree-mobile-solutions any physical damage.
Any of the capacitors might be faulty.
Charging IC might be faulty.


If the charging is slow then all you have to do is to check with any other Samsung Galaxy Note 3 charger, but you have to make sure that the charger is original, as slow charging issues almost always occurs with phones using 3rd party chargers.
Clean battery charging pins and check.
Clean charging connector pins.

Hardware Solution

Friday, January 10, 2014

Nokia N8 Network Solution


Nokia N8 Network Solution
Nokia N8 Network pf
Nokia N8 Network ic
Nokia N8 no Network Solution

Choose network

When you turn on the phone, it automatically selects a network within range. In certain circumstances, it might be useful to select a network manually, for example when you are abroad where different networks are available (depending on which operators your operator has roaming agreements with). Follow these instructions to choose network.

1. Find "Operator selection"
  • Press the Menu key.
  • Press Settings.
  • Press Connectivity.
  • Press Network.
  • Press Operator selection.
2. Choose option
  • Choose one of the following options:
  • Select network manually, go to 2a.
  • Select network automatically, go to 2b.
2a - Select network manually
  • Press Manual.
  • Wait a moment while the phone searches for networks within range.
  • A list of available networks is displayed.
  • Press the required network.
  • After a moment the display shows whether you have access to the selected network. If the display shows that you do not have access to the selected network, it is because your operator does not have a roaming agreement with the operator in question.
When you activate manual network selection, this setting is activated until you reactivate automatic network selection. If you are out of range of the selected network, the phone will not work.
2b - Select network automatically
  • Press Automatic.

Sunday, January 5, 2014

Nokia 114 , 110 ,Lcd Jumper Solution


Nokia 110 Display Track ways
Nokia 114 Display Track ways
Nokia 114 Lcd Jumper Solution
Nokia 114 White Display Problem
Nokia 110 Lcd Jumper Solution
This article is for Nokia 114 White Display Problem Solution. If your phone’s LCD connector prints are damaged consult the diagram below. This solution works for nokia 114.

Having nokia 114 White Display Problem, I have marked display ways jumper points in this diagram. Only make these jumpers if necessary like if any of the prints are busted. If the LCD connector is in good shape replace the LCD itself.


Tested By musharraf Ali
 Your Own Risk we are not responsible if these solutions may cause any harm to your Device.

Monday, June 11, 2012

Friday, June 8, 2012

LCD Display ways, a solution for Nokia 1616 Display Problem


If you encountered and try to fix a display problem like white screen, blue screen, a blank or black screen display on Nokia 1616. And also tried to replace it with a new LCD replacement but nothing happens and the problem still exists.  This solution will show you a particular component parts which possibly might damaged and cause the LCD display problem.


 The Nokia 1616 LCD Display pin connections to each particular components

The LCD display data signals are feeds from the data processor IC and filtered by a surface mount inductors or filter coil and a also chip resistors.  If this chip filter coil and  chip resistors being damaged, the display data signals which being feed to the LCD will be cut off and result to a display problem issues.
You may trace first the line paths of the LCD pins to each corresponding chip filter coils, Then check all of each surface mount inductor coil and resistors, all of the resistors valued  100 ohms each.

Nokia 1800, 1616 LCD Display Problem - Lines and components Test and Tracing spots


This repair solution show the particular components and line paths of  Nokia 1800 and Nokia 1616 Lcd display signals. This guide can be used for quick troubleshooting and repairing display problem issues on Nokia 1800 and Nokia 1616.
This repair guide shows  on where and which particular components of the LCD data signal feeds across to a particular components, including even the solder ball bumps of the infeon X-gold 110 chip through to the LCD filter coils, resistors and LCD display module.


 There are two LCD voltages that feeds to the LCD module, the 1.8 volts Dc which is in color pink line and the 2.8 volts which is in green line.  The other four which are the display data signals.
This guide is useful when the display data filter coils and resistors already been replaced but the problem still exists. You can trace all of those corresponding line paths when the time that you need to remove, rework and even trying to replace a new IC

Solutions for Nokia 1800 and Nokia 1616 Insert Sim Card Problem


Here's a complete repair guide to fix Nokia 1800 and Nokia 1616 Insert Sim Card problem issues. This solution shows the complete line paths of the SIM card circuit which we can used for easy troubleshooting procedures, including its connection to the IC components solder ball bumps.


Nokia 1800 and Nokia 1616 Sim card circuit connection layout


The Sim card circuit of Nokia 1616 and Nokia 1800 used an  EMI filter chip for the circuit protection.
This EMI filter IC can be damaged if an excessive electromagnetic interference or electrostatic discharge interfere with the circuit. The Vsim which is the voltage being supplied to the sim card to make it work also cause the problem if being cut or damaged, this voltage range from 1.8  to 2.4 volts, the voltage varies according to the type of SIM card.

Repair hints for Insert SIM card Problem repair procedures:
1. You may check the circuit surroundings first and see to it that it is free from dirt, foreign object and corrosion, a corroded components may also cause the problem, clean it first as necessary.

2. You may start to check the VSIM line paths continuity  by using a multimeter, start from the VSIM capacitor   through to the SIM card pin connector, to check if that said line is okay.

3. Check the ground line of the sim card pin connector, If the ground line is cut it also cause the problem.

4. Remove the EMI filter chip if the above check up is okay, check the EMI filter IC internal line paths, from solder bumps; A2 and A3 are the line for the the SIM data and the resistance value is 100ohms, B1 and B3 SIM reset, the resistance value is 100 ohms also and then C1 and C3 for the SIM clock signals which has a resistance of 47 ohms. Replace it if found busted or damaged, you can easily find a replacement for it in other non working Nokia cell phone models PCB board that has an EMI filter IC also, just look for the solder bumps configuration if it's same.

5. This part may need an adequate experience and extra care to handle with or you may end up killing the phone, if you are a beginner mobile phone techie  you may need to ask assistance to your head tech or a senior and most experience one technician before doing this procedure.
Now if all the above does not solve the problem, you may need to reflow, rework, remove the main IC labeled X-gold 110, then check the solder bumps continuity through to the SIM pin connectors, then reball it and in-place it back

Charging problem solution for Nokia 1800 and Nokia 1616


This solution shows the complete line paths of Nokia 1800 and Nokia 1616 charging circuit connections that can be used for repairing charging problem issues on the device such as, Not charging, Charging no response when inserted or it does not show charging indication when a charger is being plug-in.

Nokia 1616 and Nokia 1800 Not Charging Solution  ( circuit connection line paths )

Nokia 1616 and Nokia 1800 charging ways

Repair Procedure on Nokia 1800 and Noki1616 not charging problem.
procedure below may varies accordingly from case to case basis.

1. Check the charging pin connector if its free from dirt and corrosion. Clean it if corroded or  find a replacement spare on it then replace it.

2. Check and clean the charging pin connector terminal contact pads.

3. Check the chip fuse if it is busted or damaged by using a multimeter. If found damaged, check the chip diode if shorted. Replace both of it the don't apply jumper on the chip fuse, this method can still save the phone in the future, if you apply jumper on it directly the phone will be dead if a short circuit happen on that particular area again and other than that, it's so very unprofessional way.
You can easily find a replacement of this spare parts component to other non working PCB board.

4. Check all the  components remaining as shown on the solution picture, a resistor marked R2200 is a fusible resistor which has a value of 0.55 ohms. This resistance value consider as fusible and may easily break or cut if a short circuit has occurs like a water damaged devices.

5. Those  transistor shown in the solution image  is the voltage regulator that holds and control the charging voltage from the battery charger. The small one has six legs on it and the other one which the big has three legs, just refer to the PCB board layout of your device for the exact component layout.
replace both of it if not so familiar to check those components.

6. The last part needs adequate experience to perform if all of the above does not solve the problem,
Take note: you may do this at your own risk.. just don't do it if your just a beginner or you may end up killing the phone.  re-flowing and reworking the X-gold 110 chip needs extra care and proper training

Keypad and LCD Display backlight LED failure solution for Nokia 1800 and Nokia 1616


This solutions shows the location of particular components or spare parts on the PCB board layout that might get damaged and cause the device for unable to light up the LCD display backlight LED's including the keypad backlight LED.

Nokia 1800 and Nokia 1616 LCD display backlights circuit components layout

This also includes the line paths of each particular voltage and current that feeds to the backlight LED's of the LCD display module from the inner most part of the main ic component solder ball bumps for deep troubleshooting analysis.

Repair tips: check and have a continuity test on all filter coils and each lines paths from where it is being connected according to the picture's layout

Earpiece and Ringer Speaker Solution for Nokia 1800 and Nokia 1616


Here's the repair solution to solve and fix nokia 1800 and nokia 1616 Earpiece and Loud Speaker (Ringer/buzzer) failure. In nokia 1800 and nokia 1616 the earpiece and ringer circuit have been combined and connected to a single speaker unlike the old types which  have both different speaker in each circuit.

The  below solution picture shows the line paths and layout of components for the Earpiece Speaker.You may trace all of those corresponding components if having trouble with the earpiece or Earpiece Audio sound problem. The positive and negative audio signal which flow across into four coils, a chip resistor 4.6 ohms and an EMI filter chip before it being feeds to the Speaker terminal pads and so on to the speaker.

Nokia 1800 and Nokia 1616 Earpiece Speaker components layout and line paths


The two remaining components are chip resistors, this resistors are fusible resistors with has a zero ohms value. Both positive and negative Audio signals also flow into the two filter coils and the emi filter chip then feeds trough to the speaker.

Nokia 1800 and Nokia 1616 Loud Speaker ( Ringer/Buzzer) line paths and components layout


All those components are very easy to check and you may find a replacement on it if found busted or damaged. If all of its corresponding components were already replace and making sure that all of it working perfectly okay but the problem still exists and no audio sound can be heard over the speaker, we may now consider that the problem lies on the line paths between the main IC or the IC itself is being damaged. connections.


Nokia 1800 and Nokia 1616 Earpiece and Ringer IC component solder ball bumps connection

The last solution solution for this is to reflow, rework the main IC component. Be sure to check the line paths of corresponding solder ball bumps of the IC component which holds the earpiece or the  ringer loud speaker, after reballing it and inplacing it back.
Just be careful and have a good heat temperature and air flow control using you reworking station in handling the main IC module

Microphone problem of Nokia 1616 and Nokia 1800 repair solution


Here's a simple solution that can be used to repair a damaged Nokia 1800 and Nokia 1616 Mouthpiece microphone problem, In this repair guide it shows the location of  particular components that might possibly damaged when the problem occurs. Tis solution can be used after in-placing or installing a new microphone module on the device but the problem still exists and does not solve the problem.


Mouthpiece microphone components layout and tracing line paths for nokia 1800 and nokia 1616

Repair tips:
1. Check or replace a new microphone replacement before proceeding..
2. make sure that microphone's contact pads is absolutely clean, a poor contact pads of the microphone's terminal also cause the problem.
3. check those two filter coil near the microphones contact pads, have a continuity check between the microphone's contact pad's core to each corresponding filter coil. The inner layer core is the positive and the outer layer core which  is the negative.
4. Continue to check the line paths across  to microphones circuit as shown on repair guide solution above. Trace and make sure that both positive and negative line is not cut or does not have an open circuit.
5. The B+ line indicated in the guide is the microphone's circuit power supply, If this said supply voltage is missing or cut also causes the microphone nonfunctional.
A poor quality audio sound signal also occurs if there is a damaged components on that part.
6. The IC component solder ball bumps that holds the microphones connection can be used to trace those lines if an internal cut or damaged occurred, when all of the above hints does not solve the problem.

Most Download


Text Widget

Copyright © Best All mobile Repairing solutions | Powered by Blogger

Design by Anders Noren | Blogger Theme by NewBloggerThemes.com