Best All mobile Repairing solutions, unlock pattern lock, Hang on Logo,All Box Latest UPDATES and All type CPU Format solutions provideing, How to Flash Mobile phone without BOX use and Open Google Gmail Lock

Thursday, May 17, 2012

Nokia E63 Not Charging Problem Solution

Here's the Nokia E63 Not Charging Problem Solution, this solution simply shows the location of the charging components on E63 PCB board.

To fix a charging problem like "charger no response, or fake charging this solution may help. Just refer to the solution below and locate the highlighted components.


Nokia E63 Charging Problem Solution
 
 
Some simple hints to fix Not charging Problem On Nokia E63 handset:
Nokia E63 Charger No Response problem - it doesn't show or display  battery charging indication when the charger is plug-in.
1. Try to use another working charger.
2. Check/replace the charging pin connector for possible damaged, bended or oxidation build up.
3. Clean the charging pin terminal contact pads on the PCB board.
4. Check the Fuse the coil and the diode, replace if found damaged.
Nokia E63 Fake Charging Problem - it shows or display a charging indication but the charge voltage doesn't stored or saved on the battery.  http://welcomeservice.blogspot.in/

1. Try to replace or use another working phone's battery.
2. Check and clean the battery connector. 
3. Reheat, rework or replace the BETTY IC.
4. If the problem still exists, try to rework the Power IC.
Nokia E63 Charger Not Supported Problem - it shows a "charger not supported error"on the display when the battery is plug in. http://welcomeservice.blogspot.in/

Nokia 6124c Charger Not Supported Solution

Here's the solution for Nokia 6124 classic with charger not supported problem. This solution shows which certain components needs to replace when such kind of problem occurred.

Refer to the solution below and locate the highlighted component on the PCB board. Then do a replacement for that particular component.


Nokia 6124C Not Charging solution - charger not supported
nokia 6124c charger not supported repair picture

The BTEMP (battery temperature) resistor which has a value of 47K is connected to the battery BSI (battery stat indicator) terminal. If the said component become faulty or damaged it will result and show "charger not supported" on the device when the charger is being plug-in. Replacing it will possibly fix the problem.http://welcomeservice.blogspot.in/

Phone repair Tutorial-Nokia firmware downgrade with JAF and USB

This tutorial is how to do the flashing in this downgrading on nokia mobile phone without using any hardware Flasher.

What is needed in this tutorial is flashing software (in this case JAF), congenital data cable, a software emulator that can emulate hardware Flasher box before, and your courage to do the flashing.

 any way used to make modifications to the Flash ROM nonetheless there is a risk that would arise such as brick on your handphone.

Without more broadly at length below is a tutorial step by step to perform downgrading the firmware nokia


1) Download and install the required programs on your PC (recommended os pc with Windows XP Service Pack 3)

JAF.1.98.62--->> _http://rapidshare.com/files/186146404/JAF.1.98.62.rar
This program has been accompanied by Flasher JAF box emulation program, but recommended using the latest version of the emulator can be found here-->>_http://www.4shared.com/file/81442708/ebe4209e/OGM_JAF_PKEY_Emulator_v4.html


2) Download the firmware you need from
this site, or you can search via google, or use NaviFirm (Credits goes to Sapie05)

3) Connect your phone to your PC using a USB cable congenital


4) Run the emulator JAF box,


In step 1, select Random Raskal PKEY SN

In step 2, select the JAF (main)
Click the GO tab (selected LAUNCHED EXE)

5) The program will run automatically JAF


Select BB5 tab

In the section Flash settings, check the options that you want to do in this case downgrade the firmware, then check the box downgrade
and uncheck the box normal
In the Operation section, click the tab INF and CHK
In Phone Mode section, click the tab? (Question mark)

6) After the firmware and your phone mode is identified, click on the FLASH tab on the Operation section for the process of flashing


7) Wait for the flashing process runs automatically until finished (done), then you've succeeded in doing flashing on your mobile phone


This tutorial was tested on my mobile phone with some good, but still there is risk of failure at the flashing process


Note:

Install Nokia Flashing Cable Driver and Nokia Service Tool Drivers beforehand if JAF can not detect your phone


What is An Application Processor in Mobile Phones Circuit Do

https://blogger.googleusercontent.com/img/b/R29vZ2xl/AVvXsEhXdyijT-uAfaVAiVgWMVPpJ-VH4-hg2TVcPZADVrBmav7VqbeEavbuXME1vVNTcD4qgtX_QAlvFtki-Wv_OwHfJj_D5rmRTWPB5vGLZ5SvFOf6ACHevZUMVtFYVC-YfsZFHDq4tUk6RHQ/s1600/application+processor.jpg
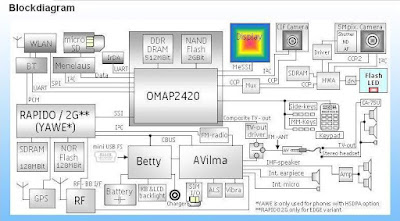
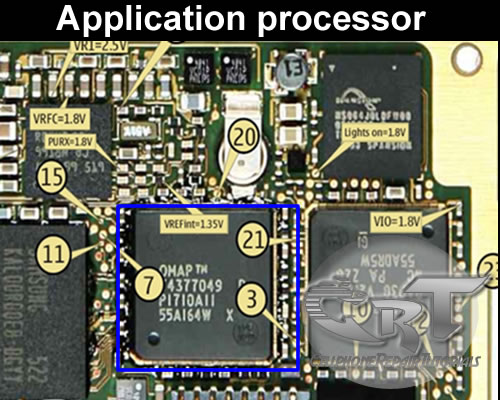
An application processor is a central proccessing unit (CPU) like the one installed on personal computer. It is the brain and controls all kind of data and information any application in mobile phones circuit.
It is microprocessor integrated circuit (IC) chip.

https://blogger.googleusercontent.com/img/b/R29vZ2xl/AVvXsEjKeNtGgzmxAqqqU31BZUHfKhu0R_tNeI4ZyXm9N2IlV831P2DVKuNiDfRACSexNSnDUe_V6J3eM99ld0hPc18mhCRebfzlfH9HJlM-R1F0DOprd52SmhJrXeoC_HWYhZJHDuRcwONZ2Hg/s1600/n95-3j.jpg

 LCD controller, camera interface, serial interfaces, memory interface,USB  controller, bluetooth and wifi controller,and more. are controlled by an the application processor.

Here's an example of an application processor block diagram below, on how this kind of IC works on mobile phones circuit. This kind of  an application is commonly used on Nokia latest designed of mobile handsets. The description of this application processor below will help us understand how does this certain IC work.
omap block diagram
omap block diagram
OMAP2420 Processor

The OMAP2420 processor is a single-chip applications processor that supports all cellular standards, and complements any modem or chipset and any air interface. It is intended for high-volume wireless handset manufacturers and is not available through distributors. The OMAP2420 includes the benefits of the OMAP 2 architecture’s parallel processing, giving users the ability to instantly run applications and operate multiple functions simultaneously without quality of service compromises. The OMAP2420 includes an integrated ARM1136 processor (330 MHz), a TI TMS320C55x™DSP (220 MHz), 2D/3D graphics accelerator, imaging and video accelerator, high-performance system interconnects and industry-standard peripherals.
Graphics

The OMAP2420 processor embeds Imagination Technologies' POWERVR MBX™ graphics core, making it the first applications processor to support OpenGL ES® 1.1 and OpenVG™, providing superior graphics performance and advanced user interface capabilities. TI is enabling sophisticated and dynamic images with "smart pixel" technology offered via OpenGL ES 1.1. This unique technology allows each pixel in an image to be programmed individually, giving developers the power to create rich effects with cinematic realism. Users will now experience "life-like" facial features, advanced reflection effects and multi-textured backgrounds in the mobile environment.

Multimedia enhancements made in the OMAP2420 include an added imaging and video accelerator for higher-resolution still capture applications, multi-megapixel cameras and full-motion video encode and decode with VGA resolution of 30 frames per second. An added TV video output supports connections to television displays for displaying images and video captured from the handset. 5-Mb internal SRAM also boost streaming media performance. Access to the OMAP Developer Network also provides an extensive range of programs and media components that manufacturers can use for differentiating and delivering products to market fast.
Key Features:

    Dedicated 2D/3D graphics accelerator at 2 million polygons per second
    Added imaging and video accelerator enables high-resolution still image capture, larger screen sizes and higher video frame rates
    Supports high-end features including 4+ megapixel cameras, VGA-quality video, high-end interactive gaming functionality and analog/digital TV video output
    5-Mb internal SRAM boosts streaming media performance
    Software compatibility with previous OMAP processors
    Parallel processing ensures no interruptions or degradation of service with simultaneously running applications
    Optimized power management companion chip, TWL92230 12 mm x 12 mm, 325-ball MicroStar BGA™, 0.5-mm pitch

HTC 7 Pro Hard Reset - Wipe and Restore to Factory Default Settings Procedures


This is a step by step instruction on how to hard reset (factory reset) the HTC 7 Pro and restore to factory default settings. 


NOTE: Performing a Factory reset  will permanently delete all your data and customized settings, and it will also remove all applications  you’ve downloaded and installed on the device. Make sure to have a back up copy of any data and files you want to keep before you do a factory reset.

Performing a factory reset via Menu settings


   1. From the home screen, swipe left to expose your app list
   2. Select Settings
   3. Scroll down and select about
   4. Select reset your phone
   5. Select yes to confirm, then select yes to confirm again


If having problem how to turn on the phone or access the phone settings, or it become frozen or  unresponsive you can still perform a factory reset by using the buttons of the phone.


Here's how to hard reset your HTC 7 Pro via button combination.

   1. Shut down the phone or turned it off, or remove the battery and then reinsert it back again.
press and hold the VOLUME UP and DOWN buttons, and then briefly press the POWER button.
   2. Wait for  the instructions to show on the screen on how to do the factory reset, and then release the VOLUME UP and DOWN buttons.
   3. Follow the instructions onscreen how to factory reset your phone.

Then your HTC 7 Pro will  then reboot and you'll be left with a factory fresh phone.


Most Download


Text Widget

Copyright © Best All mobile Repairing solutions | Powered by Blogger

Design by Anders Noren | Blogger Theme by NewBloggerThemes.com