Best All mobile Repairing solutions, unlock pattern lock, Hang on Logo,All Box Latest UPDATES and All type CPU Format solutions provideing, How to Flash Mobile phone without BOX use and Open Google Gmail Lock

Tuesday, May 29, 2012

MOTOROLA XPRT HARD RESET, WIPE DATA CACHE AND RESTORE TO ORIGINAL FACTORY SETTING

Here's the step by procedure on how to Factory reset Motorola XPRT to wipe data cache and restore it to original factory default settings. Just follow the simple instruction below, and please back-up all important data stored or installed on the device before proceedings.. 

Motorola XPRT Factory Reset through Menu Settings: This will simply Reset your device into factory default settings.

From the main HOME SCREEN, 
->select MENU 
->select Settings, 
->select PRIVACY
->select FACTORY DATA RESET
->select RESET PHONE
->Enter PASSWORD if prompted
->select ERASE EVERYTHING

 Motorola XPRT Hard reset through button combination, this will prompt you into recovery mode.
this may help if the Motorola XPRT is frozen,hang or unresponsive. 

   1. Turn the power off or remove the battery and reinsert it back again after a couple of seconds. 
   2. Press and hold the POWER+CAMERA buttons together
   3. Release the Camera button when prompted
   4. Press and hold the Volume Down key
   5. It will show a yellow exclamation mark
   6. Select the Wipe data/factory reset (Alt + W) option

Hope this may help.. Enjoy!

FIX HANG FROZEN PROBLEM FOR SONY ERICSSON XPERIA X10 MINI PRO: HARD RESET

This a simple guide on how to hard reset  Sony Ericsson Xperia  and restore the device to its original factory default settings. This may also help to fix the said android smartphone if suffered severe hang or freezing problems. This may work on Sony Ericsson Xperia Mini, Mini Pro, X10 Mini and X10 Mini PRO. 

Note: A hard reset process will wipe or delete the data stored on the device, so make sure to back of all important files you've installed or stored on the phones memory. However, this may not harm the files stored on the microSD memory card.  

Factory Reset by Settings:
This can be done from Main Home Screen
then select SETTINGS, then PRIVACY
select FACTORY DATA RESET and then RESET PHONE
then choose ERASE EVERYTHING

This will wipe the present settings and then restore back the device to its factory settings. 


If your Xperia X10 Mini or mini Pro experienced Hang or Freezing problem.
Sometimes you may just stuck on the start up logo, this may help if you can't access or get through to the home screen. If this happens you may reboot the phone by way of pressing button combination and do a hard reset.

- Turn the power off or remove the battery out and reinsert it back again.
- Hold the Left and right buttons found beneath the LCD display
- Briefly Press and release the Power button
- Follow the steps on-screen  to hard reset your phone 

If somehow if the hard reset will not fix hang or frozen problem, the only and final option is to restore or flash the phone's original stock ROM or firmware.

T-MOBILE SAMSUNG EXHIBIT 4G SGH-T759 HARD RESET/WIPE DATA FACTORY RESET PROCEDURE

samsung exhibit 4g hard reset
Here's a step by step guide on how to Factory Reset the Samsung Exhibit 4G by T-Mobile. This may help if having unwanted issues using the phone like, freezing, hang on logo, become laggy on some applications etc. And or if you just wanted to restore it back to it's original factory default settings. 

Note: This process will wipe all data stored on the phone. Just make a back up copy of all important data store on the phone (use any back up application from android market) before proceeding. 


Factory Reset from menu settings:

- On the main home screen,
- Tap Menu
- Tap Settings, then Privacy
- Tap Factory data reset
- Tap Reset phone
- Tap Erase everything to confirm

Samsung Exhibit 4G Hard Reset by button combination:
This can be done if the phone is frozen or just stuck on logo.

- First turn power off or pull the battery out and reinsert it back again
- Hold the Volume Down button then Press and release the Power button
 the device will boot into recovery mode
- Just select Wipe data/factory reset.

Then your Samsung Exhibit 4G will then reboot to factory fresh default settings. 

How Do SIM Card Works on Mobile Phones Circuit


A SIM Card also known as Subscriber Identity Module, A SIM is a Smart Card that can store data from a cellular phone. Those data like identity, location and phone number, network authorization data, personal security keys, contact lists and stored text messages. Security features include authentication and encryption to protect data and prevent eavesdropping.

But how does this SIM card works within the mobile phones circuit? How does mobile phones reads and write data unto it?

In those particular questions above, If we learn answers unto it, we can solve problem issues regarding SIM related problems, like Insert Sim Card and etc.

Now here's a brief explanation on how does SIM Circuit Works on a mobile phones circuit.


A Sim Card have six pads that also corresponds to the six SIM connectors pins, but only five has totally have connection on the entire layout.

SIM DATA
 - this is a digital data that being stored on a SIM memory
SIM Clock
 - this is a clock frequency signal that being synchronize to the digital data to create data signal in order transfer or sends and receive data information.
SIM Reset
 - this is also a frequency signal that triggers or reset all synchronization process.
VSIM 
B+ Supply Voltage- This a power supply voltage used to activated the SIM circuit.
SIM Ground
 - a ground line voltage
The other one is not connected
Sim card circuit  block diagram

A Typical block Diagram above shows on how SIM Circuit Works on a Cellular phones circuits.
In the layout the Sim Interface Connector connected directly to SIM Control Circuit. The SIM Control Circuit is the one the generates Clock frequency that triggers the SIM data storage, once the SIM is now being  triggered, it is then now sends data information to the application processor to  begin the process with. The application processor is the one that gathered  all data information from the SIM memory, initiate and activate it, if all information is in desired status.
Those three particular lines of signal flows associated in the circuit shows how the synchronization is being applied. If one of those lines being cut off the sending and receiving process will breakdown, and  will result to SIM problem issues. The Power Supply Voltage through the SIM is also remain stable otherwise a lack of voltage will not activate the SIM to work.
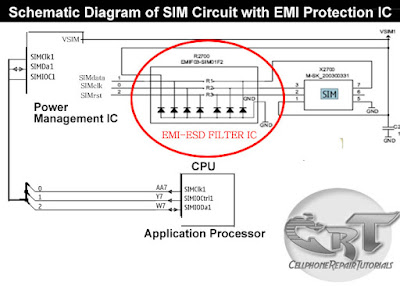
Sim circuit schematic diagram/></a></div><br /> Above an schematic diagram of a SIM Circuit on a <b>NOKIA</b> mobile phone tells us a brief information how a SIM circuit being connected trough the rest of each components.<br /> In <b>Nokia Mobile Phones</b> the Sim circuit is being connected to the <b>Power Management IC</b> then feeds directly also to the <b>Application Processor or CPU</b>.<br /> Some other circuits like the picture below used an <a href="http://cellphonerepairtutorials.blogspot.com/2010/04/emi-esd-filters.html"><b>EMI-ESD</b></a> filtering method, to prevent Electro-magnetic Interference and Electro-Static Discharge damaging the mobile phone

In a picture below an EMI-ESD Filter has been added to protect  the circuit to an Electro-static Discharge and Electro-magnetic Interference disorders. This type of SIM connection circuit is an advantage to mobile phone technician for troubleshooting SIM related problem issues. Thus, type of particular EMI filter is very vulnerable  and mostly create breakdown to the entire SIM connection.
sim circuit schematic diagram 2 /></a></div><div class=
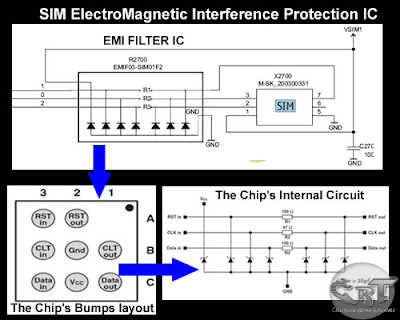
The picture below is an equivalent layout of  an EMI filter and its internal circuitry,
only both frequency and data lines is being filtered.
sim emi-esd filter/></a></div><div class=
The EMI Filter is a tiny chips designed to protect  SIM DATA, SIM Clock and SIM Reset data  signals that flow across trough the SIM connector.
sim
 The EMI-ESD Filter is a highly integrated device designed to suppress EMI(Electromagnetic Interference) and RFI(Radio frequency Interference in a circuit. This filter includes ESD protection circuitry which prevents damaging the mobile phone application when subject to ESD ( ElectroStatic Discharge) surges up to 15 kV.

Here's an example of how the the SIM data signal  flow across the printed circuit board.
Note: this is only shows where the signal flows from component to componentconnections.

 
 A picture above is an alternative way by many mobile phone technician dealing with SIM problem issues on most Nokia Mobile Phones.

Flash mtk with usb only, no box ,no solder rx tx


1. mito 277 mtk6252 , for boot press * readback start address 0x00000000 length 0x00800000
2. mito 355 mtk6252, for boot press green button readback start address 0x00000000 length 0x00800000
3. mito 318 mtk6252, for boot press top right corner readback start address 0x00000000 length 0x00800000
4. mito 611 mtk6253 , for boot press top right corner readback start address 0x00000000 length 0x01000000
5. mito 833 touch mtk 6253 , for boot press lower right corner/end call button readback start address 0x00000000 length 0x01000000
6. mito 866 mtk6235b nand flash , for boot press top right corner upper game button readback start address 0x00000000 length 0x08000000
7. mito 380 mtk6252 , for boot press del/enter button
8. buat visio v999 (touchscreen) for boot press middle button at navigation
9. nexian g522 mtk 6225 for boot press Q button readback start address 0x00000000 length 0x01000000
10. SPC jazzone .. mtk 6253 for boot press green button
11. nexian g900 mtk6225 for boot press Q button readback start address 0x00000000 length 0x02000000
12. mito 588 mtk 6252 boot for boot press lower right corner readback start address 0x00000000 length 0x00800000
13. ht g33 mtk6235b nand flash for boot press Q button / * readback start address 0x00000000 length 0x04000000
14. beyond b111 mtk 6252 for boot press lower right corner atas readback start address 0x00000000 length 0x00800000
15. mito 312 mtk6252, for boot press lower right corner atas readback start address 0x00000000 length 0x00800000
16. nexian g911 mtk6225 for boot press Q button readback start address 0x00000000 length 0x02000000
17. ht a15 mtk6252 , for boot press * button readback start address 0x00000000 length 0x00800000
18. gvoon330 mtk6252 for boot press call button & 1 readback start address 0x00000000 length 0x00800000
19. nexian g722 mtk6225. for boot press Q button readback start address 0x00000000 length 0x02000000
20.nexiAn tap 868 for boot press call button.
21.nexian g801 xl,MTK 6235,for boot press space button
22.Nokia X8-00 MTK6253, boot mode vol -
23.mito 255 mtk6252 tombol for boot press * button or # readback start address 0x00000000 length 0x00800000
24.mito 388 mtk6252 tombol for boot press * button or # readback start address 0x00000000 length 0x00800000
25.nexian g912 mtk 6225 for boot press Q button readback start address 0x00000000 length 0x02000000
26.nexian g922 mtk 6225 for boot press Q button readback start address 0x00000000 length 0x02000000
27. nokia n900 china mtk 6225 for boot press enter button
28 nexian g923 mtk6225 for boot press Q button
29.mito 311 mtk6253 for boot press back/near left power on/off readback start address 0x00000000 length 0x01000000
30.gvon 111 mtk6252 for boot upper right button
31.pixcom model pg20 mtk6253 for boot upper right button
32.taxco m8 mtk6252 for boot upper left button readback start address 0x00000000 length 0x00400000
33.ht mobile a25 mtk6253 for boot upper right button readback start address 0x00000000 length 0x01000000 its only for MTK Chipset not another Chipset CPU any kinds the topic is just for MTK remember that?

DOWNLOAD  TOOLS AND USB DRIVER   MEDIAFIRE  FREE 100%


Manual Videos:
1. Flashing Mito with USB device
2. Flashing Mito 355 with USB Device
3. and many more.

ps: please try to boot one by one the whole keypad button


Monday, May 28, 2012

Sfr 344 unlock 100% and pinout


Sfr 344 unlock 100% and pinout
InfinityBox Mmodule 4.05
unlock method: smart fast
PINOUT attached

""LOG FILE
COM3 [VCP1] selected
module v4.05
Action: "sp-unlock"
unlock method: smart fast
Model: SFR-344
Checking data, wait...
Phone should be Switched OFF !
Press and HOLD Power button now !
19200 autodetect
Initializing [6253:8A02:8A00]...
CPU: MT6253
high speed boot On
chip: 0000:0000:000F
status: FF
Connecting at 19200, wait...
Release Power button now !
Phone detected, wait...
Hardware: MT6253,E02
Date: 2000.00.00
Version: 1.0
Version: X730_V2_Z1_FRES_B20F108
Version: MB5307AV1BMB_BV1.0
115 byte(s) read
imei: 86440800013380
connection Ok
216 byte(s) read
reading data...
reading data #2...
building new data...
writing data...
204 byte(s) read
reading data...
264 byte(s) read
building new data...
writing data...
verifying...
verification Ok
done
Finished, time used: 13 sec
Remove/Install battery now !""

Most Download


Text Widget

Copyright © Best All mobile Repairing solutions | Powered by Blogger

Design by Anders Noren | Blogger Theme by NewBloggerThemes.com