Wednesday, May 30, 2012
How to Identify Capacitors Symbols and Layout
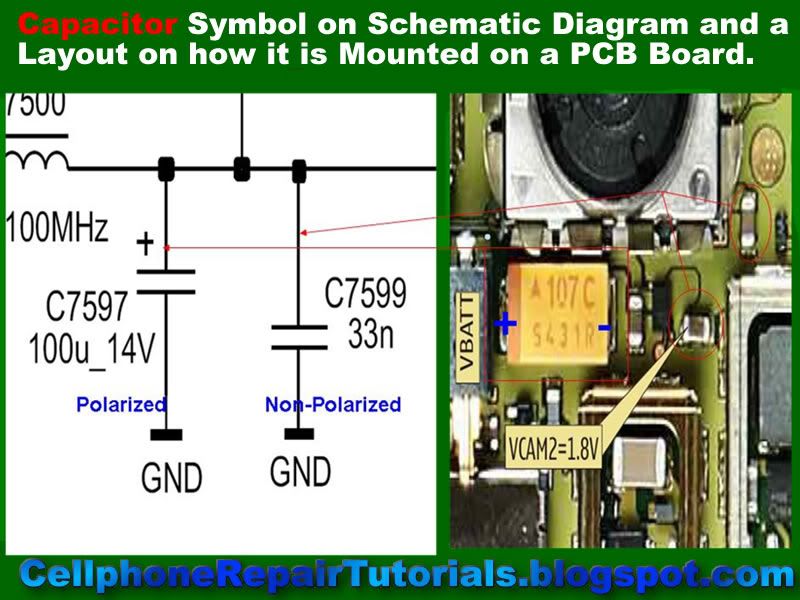
There are two types of capacitors, the Polarized and the Non-polarized. The Polarized is indicated with ''+'' positive and ''-'' negative, meaning this cannot be change into its mounting position from a certain connection of a circuit polarity, The ''+'' positive is for the voltage supply line B+ only and the '' - '' negative is for the grounding lines. The capacitor will blown up if putting it into a non desired polarity position.
Non-polarized capacitor is a non-polar or without polarity meaning its position can be change without damaging it.
In Schematic Diagram it is stated as letter ''C'' stands for Capacitance then a mounting code and Capacitance value.

The Polarized indicated with desired maximum voltage value. like for example
C7597 1000mF_14V ,
the ''14V'' is the desired maximum voltage for that said capacitor.
While the Non-polarized labeled without desired voltage.
example: C2567 22pF
Non-polarized capacitor is a non-polar or without polarity meaning its position can be change without damaging it.
In Schematic Diagram it is stated as letter ''C'' stands for Capacitance then a mounting code and Capacitance value.

The Polarized indicated with desired maximum voltage value. like for example
C7597 1000mF_14V ,
the ''14V'' is the desired maximum voltage for that said capacitor.
While the Non-polarized labeled without desired voltage.
example: C2567 22pF
LCD Display Problem repair solution on Nokia 5000d
The LCD display circuit comes with a display driver IC, which is a good spot to start to check, test, rework and replace.
LG KP500 IMEI Change Without Any Box
1st if you want unlock:
step by step to unlock KP500
1- instal lg drivers, i think that this one is enough:
http://rapidshare.com
then connect mob with usb cable without battery,sim or any memory(mmc) it will find new hardware, let it install drivers auto
after install drivers remove phone from usb port
2- donwload this:
http://rapidshare.com
extract and put the file "KP500.flb" in c:\
3- open the software KP500-Utils-EN.exe
Press O ( Backup STATIC_EEP...)
then ENTER
then write: \\.\USB1 and press ENTER
then write: C:\KP500.flb and press ENTER
then write static_eep and press ENTER
then connect phone to usb and wait, it should create 2 files in Lg-utils folder, one with name STATIC_EEP with 80kb and other STATIC_EEP.big
delete the STATIC_EEP.big file
and copy STATIC_EEP file to c:\
4- then open again KP500-Utils-EN.exe software if you close it
write P (Unlock) then ENTER
then write c:\STATIC_EEP and ENTER
unlock code will appear
now turn on the phone, type 2945#*71001#
enter in UNLOCK SIM then NETWORK LOCK then it will ask you for code, type the code you got then phone unlocked
(to create KPXXX.flb files you should read this thread till step 3)
(after step 3 you dont need to read more, you have one or two .flb files then all you need to do is pick the bigger .flb file and copy to c:\ and
rename it to KPxxx.flb then unlock the same way as KP500 instructions
Nokia C6 Format Soft Reset - Hard Reset to Factory Settings
How to format or reset the Nokia C6 to factory fresh default settings.
This instructions below is a guide on how to reset the device.
Note: This process may delete the files you installed on Nokia C6. This may only advisable if the phone experiencing frozen or hang problems, burned out by excessive use or after installing 3rd party applications. You may need to back up all important data stored on the phone before you proceed,
Nokia C6 Soft Reset:
This will not harmed your data . Soft reset only restores .ini files from Flash ROM on board memory of your Nokia C6.
1.). Dial *#7780#
2). Press Ok/Yes
Nokia C6 Hard Reset
This will delete your data and installed applications. Hard reset will fully restore your Nokia C5-03 to default factory setting.
1). Turn the Nokia C6 OFF
2). Remove the battery and reinsert it back again, then Turn it ON.
3). Dial this numbers *#7370#
4). Then Press Ok/Yes
Nokia C6 Hard Reset through button combination.
1). Turn the Nokia C6 OFF
2). Pull out the battery and reinsert it back again, then Power it ON
3). Simultaneously press and hold *+3+Call Button (green/ok button)
Samsung smiley T359 Hard Reset Procedure
Here's a step by step instruction on how to factory reset and restore the Samsung Smiley T359 to it original default settings.
Note: Do a back-up copy of all your installed data on the device for it will be wipe out in this process.

To reset the phone through menu settings:
1. From the Main Home screen, Press menu
2. Select Settings
3. Select Reset Settings
4. A highlight option and highlight All will be presented, you may choose by using the red button to mark the selection.
5. Select and Press Reset
6. Enter the password if prompted, the default is 1234
7. Then confirm
or use this method: type*2767*3855#
Note: Do a back-up copy of all your installed data on the device for it will be wipe out in this process.

To reset the phone through menu settings:
1. From the Main Home screen, Press menu
2. Select Settings
3. Select Reset Settings
4. A highlight option and highlight All will be presented, you may choose by using the red button to mark the selection.
5. Select and Press Reset
6. Enter the password if prompted, the default is 1234
7. Then confirm
or use this method: type*2767*3855#
Samsung Galaxy TAB GT-P1000 Hard Reset Procedure
FORMATTING CODE
Here's the instructions on how to hard reset the Samsung Galaxy TAB GT-P1000. Please do have a back-up copy all of the important documents stored on the device, it will be all deleted including any 3rd-party applications installed on it.
Samsung Galaxy TAB GT-P1000 Hard Reset
To reset the phone:
1. Select Settings
2. Select Privacy
3. Select Factory Data Reset
4. Then select Reset Tablet
If the Samsung Galaxy TAB GT-P1000 is frozen or unresponsive, you can do hard reset through button key combination.
To hard reset:
1. Turn the Samsung Galaxy TAB GT-P1000 Power OFF
2. Press and Hold the Volume Down and Briefly press the Power button.
3.Release the Power button button when the Samasung logo appears.
4. An additional menu will appear, just follow the whole instruction to hard reset the device.
The device will then reboot, after this process been done and back to its original factory default settings.
Subscribe to:
Posts (Atom)


