Best All mobile Repairing solutions, unlock pattern lock, Hang on Logo,All Box Latest UPDATES and All type CPU Format solutions provideing, How to Flash Mobile phone without BOX use and Open Google Gmail Lock

Monday, October 6, 2014

How To Unloak Pattern Lock From Mtk Android Using Volcano Box

How To Remove Pattern Lock From Mtk 

           Android Using Volcano Box

Volcano Box Reset Pattern Lock,Root,Wipe Without Usb Debugging Solution
MTK Android Reset Pattern Lock,Root,Wipe Without Usb Debugging With Volcano Box
http://goo.gl/l5rx6v
Step-1 Download Software
2-Install Mauimeta_exe_3g_v6.1316.1
3- Open Software
4- Click Options
5- Click Connect Smart Phone Into Meta Mode
6- Click Reconnect Button

7- Power Off Phone
8- Insert Battery
9- Hold Volume Up Button & Insert Usb Cable
10- Update Adb Driver
When Your Phone Go To Meta Mode Release Boot Key
11- When You Will See Adb Interface On Device Manager

12- Your Phone Ready To
Reset Gmail,Root,Wipe
13- Open Volcano Box Software

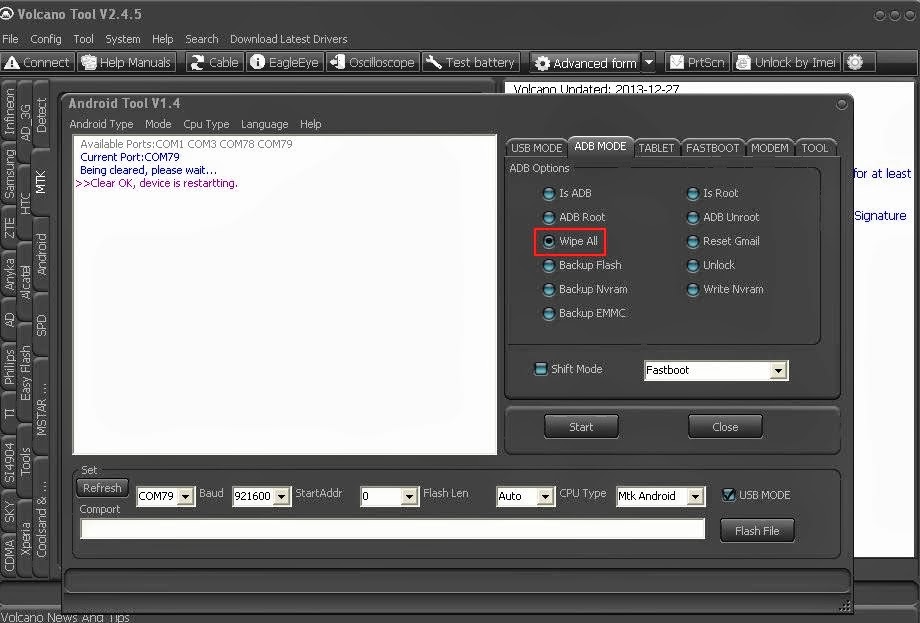
14- Go To Android Tool
15- Select Adb Mode
16- Do Adb Root, Reset Gmail,Wipe, Backup Flash, Unlock,Etc

         LINK 1    LINK 2

How To Root Samsung Galaxy S3 SCH-R530C using Odin


Root Samsung Galaxy S3 SCH-R530C using Odin

Step 1: Download and Install Samsung USB Driver on your computer. If Samsung USB Driver is already installed on your computer then Skip this Step. http://goo.gl/nvrBN4


DOWNLOAD USB DRIVER

Step 2: Download and extract the root files on your computer. After extracting you will be able to see the following files:

Download Root File LINK 1  LINK 2

Step 3: Now, Switch off your Smartphone.


Step 4: After switching-off the phone, you need to boot into Download Mode. To boot into download mode Press and hold Zoom Left and Power button at same time for 5-8 seconds until download mode is active.

Step 5: In the Download mode you will be able to see a Warning Yellow Triangle Sign. In this situation you have to press the Zoom Right key to continue.


Step 6: Now, Open Odin3 (found in the extracted files, that you have downloaded in the Step#2) on your computer. Then connect your Smartphone to the computer.


Step 7: Once you have connected the Smartphone to the computer, Odin will automatically recognize the device and show “Added” message at the lower-left panel.


Step 8: Once your device is detected by Odin, click on the PDA button and select the CF-Auto-Root.tar file (you have downloaded this file in step#2). http://goo.gl/nvrBN4


Step 9: Now, click on the Start button in Odin to begin the Flashing.


Step 10: Flashing usually takes 30-50 seconds to complete the rooting process on your Samsung Galaxy S3 SCH-R530C. Once Rooting process is completed you will be able to see a Green Box with Pass written on it in Odin. During this process Smartphone will re-boot automatically.


Step 11: Once you see, the Pass message in Odin, you can disconnect your Device from the computer.

Step 12: Now, to make sure you have successfully rooted your Samsung Galaxy S3 SCH-R530C, open Applications Menu on your Smartphone and Find SuperSU App. If this app exist on your Smartphone then it means you have successfully rooted your device. Congratulations.


Optional: You can also verify that your device is successfully rooted or not by Root Checker Application.

Sony Xperia A2 USB Driver Download


Sony Xperia A2 USB Driver Download


Ease of use to evolve. 
Starting from the palm, experience of surprise.

Commitment to all of size form and materials,  http://goo.gl/zA19x0 http://goo.gl/zA19x0
and provide a comfortable feeling of operation with one hand. 
In addition to the camera of Xperia ever best-in-class, 
and condensing the high-spec literate comfortable in every scene. 
Starting from the palm, experience of surprise. 
New Xperia evolved and ease of use. 
It shakes your senses.

DOWNLOAD USB DRIVER LINK 1   LINK 2

Sony Xperia A USB Driver Download


Sony Xperia A USB Driver Download

The Sony Xperia A SO-04E is an LTE handset running
 Android 4.1 with Palette UI and is carried by NTT Docomo in Japan. The Xperia A features a 4.6-inch, 720p display, a quad-core 1.5GHz processor, and a 13-megapixel rear camera
The Sony Xperia A SO-04E is an LTE handset running
 Android 4.1 with Palette UI and is carried by  http://goo.gl/5H7HYT
NTT Docomo in Japan. The Xperia A features a 4.6-inch, 720p display, a quad-core 1.5GHz processor, and a 13-megapixel rear camera http://goo.gl/5H7HYT
The Sony Xperia A SO-04E is an LTE handset running Android 4.1
 with Palette UI and is carried by NTT Docomo in Japan. The Xperia A features a 4.6-inch, 720p display, a quad-core 1.5GHz processor, and a 13-megapixel rear camera
The Sony Xperia A SO-04E is an LTE handset running Android 4.1 with Palette UI and is 
carried by NTT Docomo in Japan. The Xperia A features a 4.6-inch, 720p display, a quad-core 1.5GHz processor, and a 13-megapixel rear camera

Magicon Q 50 Android spreadtrum USB DRIVER FLASH TOOL IMEI TOOL FLASH FILE Download Mediafire

Magicon Q 50 Flash File Download Mediafire

USB DRIVER FLASH TOOL IMEI TOOL FLASH FILE

Magicon Q 50 Flash File Download Mediafire
Model: Q 50
Country: Foreign 
Previous VersionAndroid  
Version: Android  F3-6820-GK_GT5001-Q50_4.0_EDGE-ML-2013-06-28
Rom Size: 266 MB
Download ROM for Q 50


Magicon Q50 specifications
http://goo.gl/AVEy1j
5-inch (800 ×480 pixels) capacitive touch sceen display
Dual SIM (GSM + GSM) with Dual Standby
Android 4.0 (Ice Cream Sandwich) OS
1 GHz dual-core processor
2MP camera with LED flash
0.3MP (VGA) front-facing camera
3.5mm audio jack
512MB RAM, 4GB of internal memory, Expandable memory up to 32GB with micro SD
2G (EDGE), Wi-Fi 802.11 b/g/n, Bluetooth with A2DP and GPS
1650 mAh battery

USB DRIVER       FLASH TOOL     IMEI TOOL      FLASH FILE

    LINK 1  LINK 2                     LINK 1   LINK 2           LINK 1   LINK 2            LINK 1    LINK 2

Sunday, October 5, 2014

Z3X Shell Updated to 4.7 Download


Z3X Shell Updated to 4.7. list of changes inside
Z3X Shell BOX v4.7 Update: http://goo.gl/eym6Yz

Added:

- Icons in modules list.
- Notify reseller from hardware wizard now with name, email and message.
- Updating firmware DB now working in background.

Z3X Shell Updated to 4.7. list of changes inside
Z3X Shell v4.7 Update:

Added:

- Icons in modules list.
- Notify reseller from hardware wizard now with name, email and message. http://goo.gl/eym6Yz
- Updating firmware DB now working in background.


Direct Download  LINK 1     LINK 2

Most Download


Text Widget

Copyright © Best All mobile Repairing solutions | Powered by Blogger

Design by Anders Noren | Blogger Theme by NewBloggerThemes.com